ImJoy installation
Here we describe how you can install and maintain the ImJoy Jupyter plugin engine, which is needed to run the Python code for cell/nuclear segmentation and the pre/post processing workflows.
Install Jupyter engine for ImJoy
This you only need to do once.
We recommend installing Miniconda with Python: choose latest Python version (3.X) and your operating system. You can then use the annoconda prompt to excecute the commands listed below.
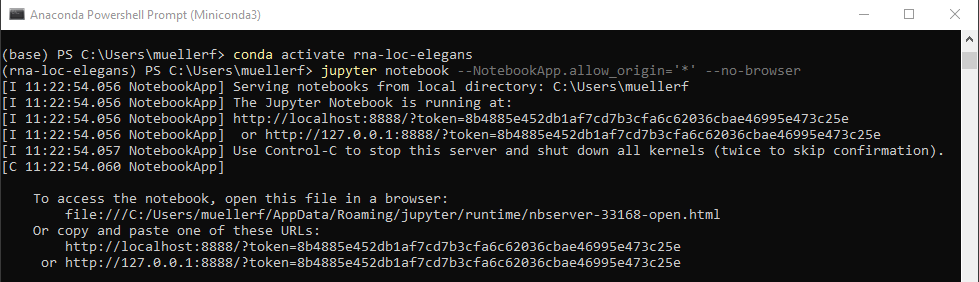
We recommend creating a dedicated environment to run code in this analysis package. To create an environment called fq-segmentation, open an anaconda prompt and type (Confirm with y when asked if you want to proceed (Proceed ([y]/n)?):
conda create --name fq-segmentation python=3.7
Activate the environment:
conda activate fq-segmentation
Install code Jupyter optimized for ImJoy:
pip install -U imjoy[jupyter]
Connect to Jupyter engine
Once installed Jupyter is installed, you can start a Jupyter Notebook in the anaconda terminal, to which ImJoy can connect.
- Please note that this engine runs on your local machine, so no data-transfer over the internet is taking place.
- In order to connect a Jupyter engine, you need to specify its url that also contains a token (a passphrase). If you launch a Jupyter notebook for the first time, you have to provide this URL to ImJoy (indicated below with First time only). After this, ImJoy will remember it.
-
Launch a Jupyter Engine for ImJoy:
- Start an anaconda terminal.
- Activate the environment:
conda activate fq-segmentation - Start Jupyter engine:
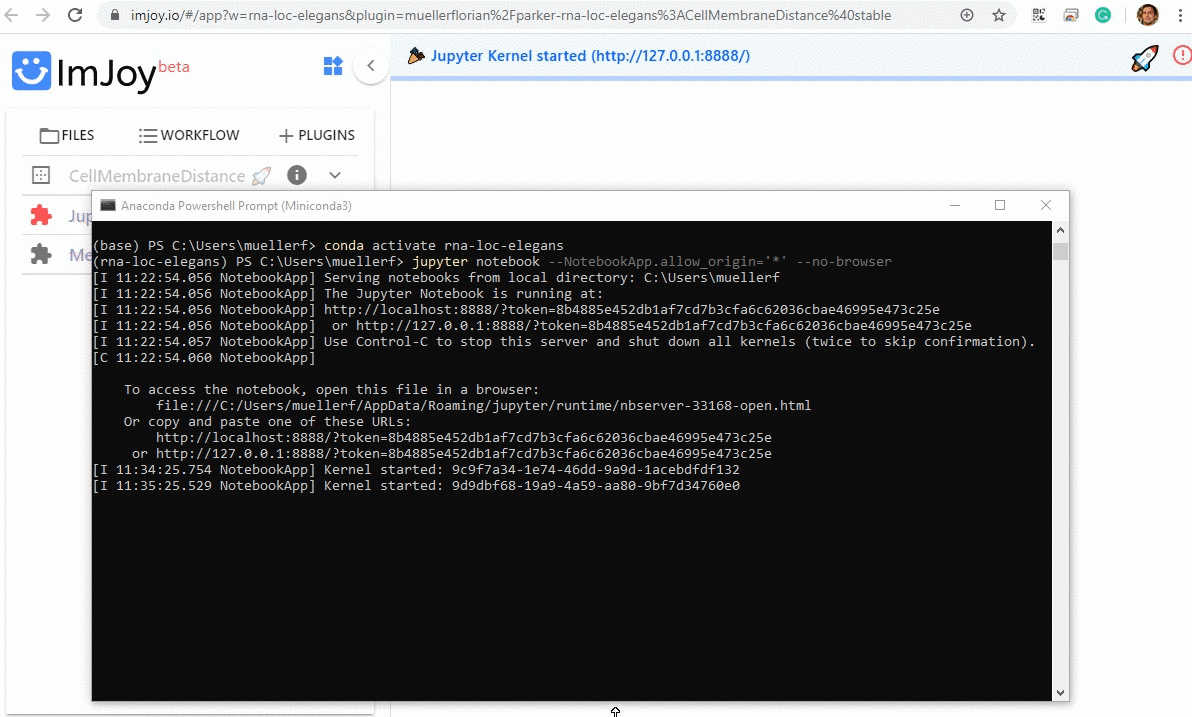
imjoy --jupyter - First time only: copy the provided URL including the token,
e.g.
http://127.0.0.1:8888/?token=8b4885e452db1af7cd7b3cfa6c62036cbae46995e473c25e
-
Connect ImJoy to Jupyter Engine:
- In the ImJoy app, press on the rocket symbol in the upper right corner.
- First time only: select
Add Jupyter-Engine, paste the URL from the step above, and you can give a new name to the engine - Subsequent use: press on the pre-defined plugin engine to connect to it (of course you have to launch it first).
- First time only: select
- In the ImJoy app, press on the rocket symbol in the upper right corner.
-
If this is the only engine, plugins will be automatically connected. You can verify this, by clicking on the puzzle symbol next to the plugin name. Depending on the plugin, installation might take a while, during this period the plugin name will be in red.
If yoy have multiple engines, you have to choose on which engine the plugin should be running (more details below).
Managing plugin engines
ImJoy remembers the plugin engines it connected to (including the token). You can obtain the list of all registered engines by pressing on the rocket symbol.
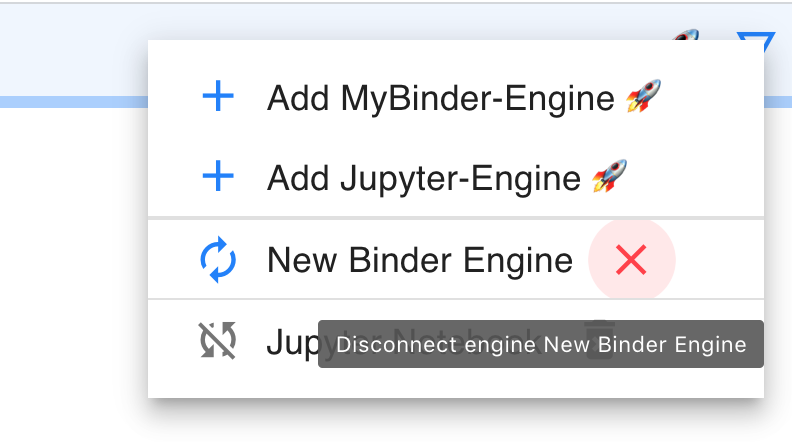
- Connected engines will be shown with their name in black, and a red cross next to the name. Pressing the cross will disconnect ImJoy from the engine, but it will remain in the list.
- Known engines (but not connected) will be shown with their name in gray, with a little trash symbol next to them. Pressing on the trash symbol will remove the engine.