Preprocessing of 3D images
Segmentation is performed on 2D images. This plugin allows to obtain 2D images from 3D images either by a projection or by saving each z-plane separately. These images are typically stored in a separate folder. 2D images by applying a projection, and these images are typically stored in a separate folder.
Install ImJoy plugin PreProcess from here.
Recommended workflow
The default settings of the plugins allow to quickly perform the recommended workflow. You only have to paste your data folder.
- 3D images are stored in a folder
acquisition -
In the pre-processing step, the folder to save data is obtained with
- the text replacement
acquisition>>analysis. - Images are stored in a new subfolder
segmentation-input
With these options, the images will be saved in a folder
acquisition\segmentation-input - the text replacement
Running the plugin
-
Before running the plugin, you have to specify a few parameters. Note that you have to perform this projection for each channel-type. This allows to use different projection methods for a channel. This can be set in the plugin interface, avaible after clicking on the arrow down next to the plugin name.
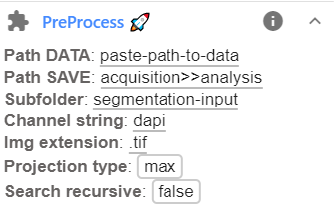
Here the following parameters can be set.
Option Type Default Description Path DATAstr Full path to folder containing data to be segmented. Path SAVEstr acquisition>>analysis Several options exist. See dedicated section here below for more details. Subfolderstr segmentation-input Sub-folder where results should be saved (if defined) Channel stringstr dapi Unique string to identify channel that should be processed. Img extensionstr .tif Extensions of images to be loaded. Projection typestr mean Different projection types: max,mean,indiv. The optionindivimplies that a z-stack is split into individual slices, stored in subfolder for each image.Search recursivebool false Should provided folder be search recursively for images (true/false). -
Pressing the button
PreProcesswill start the pre-processing. Progress can be monitored in the plugin log, available by pressing on theinext to the plugin name. -
Results will be saved in the specified folder. For each image a json file with basic properties of the file, and an image with the same name as the original one will be saved.